


With P.F. Chang's in walking distance from our apartment, it's always tempting to go get my favorite dish, their chicken lettuce wraps. Unfortunately, going out to eat all the time is not cheap, and it's usually not healthy, so I came up with this alternative.
Lettuce Wraps
makes 4 servings
1 lb of ground chicken or pork
1 large onion, diced
1 can of water chestnuts, diced
2 handfuls of bean sprouts, chopped
3 eggs
1/4 cup soy sauce
2 tsp sesame oil
1 tsp rice vinegar
2 tbsp peanut butter
1/4 cup orange juice
1 head of iceberg lettuce
Scramble 3 eggs in a lightly oiled pan. Remove from the pan and set aside in another dish.
Saute diced onions the pan until softened. Add ground meat and cook on high heat until fully cooked, mixing constantly. Add diced water chestnuts, chopped bean sprouts, and cooked eggs, mixing constantly until thoroughly heated. Add soy sauce, peanut butter, rice vinegar, and orange juice to mixture. At the last minute, add sesame oil.
Cut head of lettuce in half, and separate leaves. Serve meat mixture with lettuce cups (and if you have it, some Sriracha).

Friday, November 11, 2011
Mongolian Beef and Broccoli
This beef and broccoli is better than take out! It is very easy to prepare, taking only about 20 minutes total, including prep time. Serve it with rice, and some sriracha for some heat.
Mongolian Beef and Broccoli
Mongolian Beef and Broccoli
makes 4 servings
1 pound flank steak or other thinly sliced cut of beef
1 pound flank steak or other thinly sliced cut of beef
1/4 cup of flour or cornstarch
3 teaspoons of canola oil
1/2 tablespoon of chopped ginger
1 tablespoon of chopped garlic (about 2 -3 large cloves)
1/2 cup of water
1/2 cup of low sodium soy sauce
1/2 cup brown sugar
2 crowns of broccoli, separated into florets
Pat the steak slices dry and then mix them with the flour/cornstarch, making sure all pieces are coated, and then shaking off any excess.
Heat half of the oil in a large wok or frying pan at medium-high and add the garlic and ginger. Immediately add the soy sauce, water, and brown sugar. Cook the sauce for about 2 minutes and transfer to a bowl. Don't worry if the sauce doesn't look thick enough at this point. The corn starch in the beef will thicken it up later.
Turn the heat up and add the remaining oil to the wok. Add the beef and cook until browned. Pour the sauce back into the wok and let it cook along with the meat. Add the broccoli florets and allow sauce to slightly thicken.
Serve hot with rice.
Friday, July 22, 2011
Penne with Chicken and Zucchini
I made this for dinner last night and Derek said it was one of the best things he's ever eaten. While I highly doubt that, this was easy to prepare and is a delicious way to eat more vegetables. The pasta I used was actually from Wegman's and bigger than Penne, but I can't remember the name. It stood up well to the chicken, but any type of pasta that you have on hand would taste great.

Penne with Chicken and Zucchini
1 box of penne (or any pasta)
3 small zucchini
3 chicken breasts
1 medium onion
1 jar of tomato sauce (I used tomato & basil)
Add water to a large pot, and put it on high heat. Once the water boils, cook the pasta according to the directions on the package.
Season the chicken with some salt and pepper. In a frying pan, cook the chicken until it is no longer pink inside. While the chicken is cooking, chop the onion and zucchini into bite-sized pieces. Once the chicken is cooked, put it on the cutting board and put the onion and zucchini into the pan to soften. Chop the chicken into pieces similar in size to the onion and zucchini.
Use a strainer or the pot's lid to pour most of the water off of the pasta.
Add the chicken, onion, zucchini, and tomato sauce to the pot with the pasta and stir to coat the pasta with the sauce.
Monday, July 11, 2011
Our new apartment!
The weeks following graduation have definitely been a whirlwind! We celebrated with family and friends at our graduation party and moved out of our apartment in Blacksburg. Then, Derek took a great job offer and we moved to Towson within just a few short days. We've now spent a week in our new (although still mostly empty) apartment, and we are absolutely loving Towson. Our building is incredible, we are the first people to live in our apartment, and we can walk to shops, restaurants, Trader Joe's, and Towson Town Center.
On the Fourth of July, we watched the Towson parade from our windows, and then stepped outside the lobby of our building for a closer view. Kaiah really wanted to be a part of the parade, so she howled every time she heard fire trucks (which was a lot), and quickly became the center of attention. That night, we watched at least 25 fireworks shows from all over Towson and Baltimore county from our apartment.

Kaiah is slowly getting used to this new place. Her "den", the closet, quickly became her favorite spot, with our bed coming in a close second. We park here using Auto Park machines (like in this video), and Kaiah is not so sure about that yet. Sometimes she growls at it as it takes my car away, and sometimes she walks right up to the glass to curiously peek in.

Here are a few pictures of the building.. I'll be posting pictures of our apartment as soon as we are settled!


Friday, June 17, 2011
Red Velvet Cake with Cream Cheese Buttercream Frosting
Red velvet cake is a Southern favorite. Living in Blacksburg, which is considerably more southern than northern Virginia, I developed a pretty strong love for it. I've seen it iced with buttercream and with cream cheese frosting, but since not everyone loves the strong cream cheese flavor, I chose a sort of "hybrid" cream cheese buttercream frosting for this cake.

I baked this cake for Derek's grandpa's birthday, and did three layers to make it extra special. The recipe is basic, but be warned, everything in the kitchen will turn red, including you. Enjoy!
Red Velvet Cake (via Pinch My Salt)
2 1/2 cups sifted cake flour
1 teaspoon baking powder
1 teaspoon salt
2 Tablespoons cocoa powder (unsweetened)
2 oz. red food coloring
1/2 cup unsalted butter, at room temperature
1 1/2 cups sugar
2 eggs, at room temperature
1 teaspoon vanilla extract
1 cup buttermilk, at room temperature
1 teaspoon white vinegar
1 teaspoon baking soda
4 large egg whites
1 1/4 cup sugar
1/8 teaspoon salt
1 tablespoon vanilla
22 oz (5 1/2 sticks) unsalted butter, room temperature
12 oz (1 1/2 boxes) cream cheese, room temperature

I baked this cake for Derek's grandpa's birthday, and did three layers to make it extra special. The recipe is basic, but be warned, everything in the kitchen will turn red, including you. Enjoy!
Red Velvet Cake (via Pinch My Salt)
2 1/2 cups sifted cake flour
1 teaspoon baking powder
1 teaspoon salt
2 Tablespoons cocoa powder (unsweetened)
2 oz. red food coloring
1/2 cup unsalted butter, at room temperature
1 1/2 cups sugar
2 eggs, at room temperature
1 teaspoon vanilla extract
1 cup buttermilk, at room temperature
1 teaspoon white vinegar
1 teaspoon baking soda
- Preheat the oven to 350 degrees. Butter and lightly flour two 9-inch round cake pans.
- Sift together the cake flour, baking powder, and salt into a medium bowl; set aside. In a small bowl, mix food coloring and cocoa powder to form a thin paste without lumps; set aside.
- In a large bowl, using a hand mixer or stand mixer, beat butter and sugar together until light and fluffy, about three minutes. Beat in eggs, one at a time, then beat in vanilla and the red cocoa paste, scraping down the bowl with a spatula as you go. Add one third of the flour mixture to the butter mixture, beat well, then beat in half of the buttermilk. Beat in another third of flour mixture, then second half of buttermilk. End with the last third of the flour mixture, beat until well combined, making sure to scrape down the bowl with a spatula.
- Make sure you have cake pans buttered, floured, and nearby. In a small bowl, mix vinegar and baking soda. Yes, it will fizz! Add it to the cake batter and stir well to combine. Working quickly, divide batter evenly between the cake pans and place them in a preheated 350 degree oven. Bake for 25-30 minutes. Check early, cake is done when a toothpick inserted in the center comes out clean.
- Cool the cakes in their pans on a wire rack for 10 minutes. To remove the cakes from the pan, place a wire rack on top of the cake pan and invert, then gently lift the pan. Allow cakes to cool completely before frosting.
4 large egg whites
1 1/4 cup sugar
1/8 teaspoon salt
1 tablespoon vanilla
22 oz (5 1/2 sticks) unsalted butter, room temperature
12 oz (1 1/2 boxes) cream cheese, room temperature
- In a double boiler, whisk together the egg whites and sugar. Heat until the sugar is dissolved and the mixture is warm (about 140F), whisking frequently (about 3-5 minutes).
- Transfer the egg white/sugar mixture to the bowl of a stand mixer fitted with the whisk attachment. Add the salt and beat on high speed until the mixture is thick and glossy (about 5-7 minutes).
- Beat in the extract, then gradually add the butter and cream cheese piece by piece while beating; stop beating when the buttercream is thick and smooth.
Saturday, May 28, 2011
This looks familiar...


All photos by Kate Headley
To see the rest of the photos of that intimate wedding, head on over to Snippet and Ink.
Friday, May 27, 2011
We did it!
I am so proud to now be alumni of the Virginia Tech College of Engineering!! Yayy!!

Our parents, siblings, and grandparents drove down on Friday and we had a little cookout in our little apartment. Kaiah was over the moon with everyone visiting her.
The University commencement ceremony was (un)fortunately canceled due to rain. I think its safe to say that everyone was quite pleased not to have to sit through the boring speeches. It was fun while it lasted, though, trying to find out parents in the stands, and trying to get them to spot us, which they never did. I think something about the uniform black cap and gown made it tough. :)
The next morning we had to wake up bright and early for the College of Engineering ceremony, at which even more family members were waiting. It was easy to spot them in the stands this time, partly because it was in Cassell, not Lane, and partly because there were so many of them! We were so grateful for our cheering section as we crossed the stage.
It was an amazing weekend, filled with a lot of rain and a lot of smiles. Now we are anxiously awaiting our graduation party next weekend!

The University commencement ceremony was (un)fortunately canceled due to rain. I think its safe to say that everyone was quite pleased not to have to sit through the boring speeches. It was fun while it lasted, though, trying to find out parents in the stands, and trying to get them to spot us, which they never did. I think something about the uniform black cap and gown made it tough. :)
Thursday, April 28, 2011
Top 10 Tips for More Successful Baking from The Kitchn
One of my favorite cooking & baking blogs, The Kitchn, recently posted their Top 10 Tips for More Successful Baking. I make no secret of the fact that I LOVE baking, and I am always eager to learn new techniques and methods, so I thought I'd share the list.
1. Adjust the Oven Temperature - One of the best things you can do for yourself is buy an oven thermometer so you know exactly how hot your oven is, no matter what the dial says. If the temperature is very off, adjusting the oven dial or calling in a professional can help.
2. How to Whip Egg Whites - Here's how to tell the difference between soft peaks, firm peaks, stiff peaks, over-whipped white. Same scenario applies to making whipped cream.
3. How to Separate Eggs - No more headaches over broken yolks!
4. How to Quickly Soften Butter - Because we don't always have the foresight to set out a stick of butter to soften ahead of time.
5. How to Tell When a Cake is Finished Baking - Cakes can be such fussy things. The last thing you want to worry about is whether it's finished baking.
6. Baking Soda vs. Baking Powder - For anyone who's ever run out of one and been tempted to substitute the other. (Also, here's how to tell if baking soda has expired.)
7. How to Keep Brown Sugar Soft - And what to do if it hardens up.
8. How to Transfer Pie Crust - You go to all the trouble of making a pie crust from scratch, but how do you get it in the darn pan?!
9. How to Toast Nuts - Not only does this make your house smell amazing, but you'll be surprised at how much better your baked goods taste.
10. How to Fold Batters - This is how you get the fluffy baked goods instead of door stops.
Read the post on The Kitchn blog for the list complete with links to instructions for each of the tips!
Friday, April 15, 2011
neVer forgeT

Being a Hokie is not a mercenary relationship. It is not a business proposition. It is not an exchange of goods and services for money. It is a shared bond, a love that comes from somewhere we don't understand and can't explain to others. We do not take from this university; it gives to us. Perhaps when we first arrive on its campus, we have our own selfish interests in mind, but by the time we leave, we are transformed. We are Hokies.
It is sad and tragic that this happened to us. Because we love this university, we are devastated by what happened here. But if it was necessary for us to suffer in order for others to benefit, it is a burden we will bear, because our motto -- Ut Prosim, That I May Serve -- tells us that's what we must do. If our tragedy brings you together, if our loss makes you safer and makes you value what is important in life, if our suffering is not in vain, then we are prepared to shoulder this load ... so you don't have to. That has always been the mission of this university, and we are honored to carry it out.
Do not let the deaths of these 32 victims be in vain. Look into your hearts and see what it teaches you, and how you may be better because of what we have gone through. And know that when the bodies are in the earth, when the media has left, when others have moved on and life resumes its course, that for us, there is only one emotion left: Love. Love for this university, love for the people who died on April 16th, 2007, and love for those who are left behind.
Remember this, and what happened here will not have been for naught.
William Neal Stewart
Thursday, April 14, 2011

Monday, April 11, 2011
My favorite wedding EVER.
I mean it. Titled by Style Me Pretty as "Beyond Chic in Napa Valley", I am in love with the the blush tones, the ranunculus bouquet, and THAT DRESS. I showed this wedding to Derek and even he said, "it's the dress, isn't it?" It is sheer perfection by the incredible Monique Lhullier and I would wear it in heartbeat. Did I mention I'm obsessed with the dress? Admire it all for yourself..


Yup, I just died.

Yup, I just died.
Wednesday, April 6, 2011
Two Bean Turkey Chili
I'm always looking for meals that are easy to prepare, hearty (because I need to fill up my eternally hungry German boy), and healthy. Not only does homemade chili meet these requirements, but I can make a lot at one time to hopefully last a few days. Like most of the meals I make, I tend to change this recipe based on what we're in the mood for and what's on sale. If ground chicken or beef is on sale, I'll substitute it for chicken. If we're in the mood to eat vegetarian, I'll add more variety, like black beans and chick peas. Any way it's altered, chili is always delicious comfort food.
Two Bean Turkey Chili
1 large onion, diced
1.25 pounds of ground turkey
1 large can (or 3 smaller cans) of kidney beans
1 large can (or 3 smaller cans) of pinto beans
2 28oz cans of petite diced tomatoes
1 package of McCormick 30% less sodium Chili Seasoning
4 cups of water
Toppings
Shredded cheddar cheese
Diced onions
Nonfat plain yogurt or nonfat sour cream
In a very large pot, sauté diced onions for 5 minutes, or until tender, stirring frequently.

In the meantime, open and drain the cans of beans, and open the cans of tomatoes.

Add the meat to the pot, stirring frequently until brown.

Once the meat has browned, add the beans and tomatoes to the pot, as well as the chili seasoning and water.
Let the chili simmer until you are ready to eat.

Top with the toppings of your choice and serve with rice, chips, or bread.
Enjoy!
Two Bean Turkey Chili
1 large onion, diced
1.25 pounds of ground turkey
1 large can (or 3 smaller cans) of kidney beans
1 large can (or 3 smaller cans) of pinto beans
2 28oz cans of petite diced tomatoes
1 package of McCormick 30% less sodium Chili Seasoning
4 cups of water
Toppings
Shredded cheddar cheese
Diced onions
Nonfat plain yogurt or nonfat sour cream
In a very large pot, sauté diced onions for 5 minutes, or until tender, stirring frequently.
In the meantime, open and drain the cans of beans, and open the cans of tomatoes.
Add the meat to the pot, stirring frequently until brown.
Once the meat has browned, add the beans and tomatoes to the pot, as well as the chili seasoning and water.
Let the chili simmer until you are ready to eat.
Top with the toppings of your choice and serve with rice, chips, or bread.
Enjoy!
Tuesday, April 5, 2011
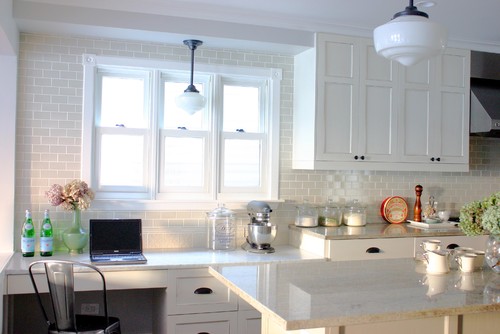
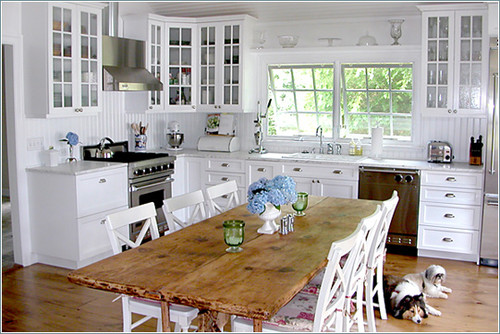
I'm dreaming of a white.. kitchen
When we start looking to buy our first home, Derek and I both know that neither of us wants to purchase something that is "move-in ready" or "recently renovated". We are excited to make it our own, from top to bottom, even if that means weekends spent hammering away and a few days without running water.
I can't wait to have a bright and airy, white kitchen. One of my favorite places to find home design inspiration is a website called Houzz. After making an account, you can save pictures to "ideabooks". Pictures of everything from kitchens to kids' rooms are added frequently by designers. Here are just a few of my favorite white kitchens..
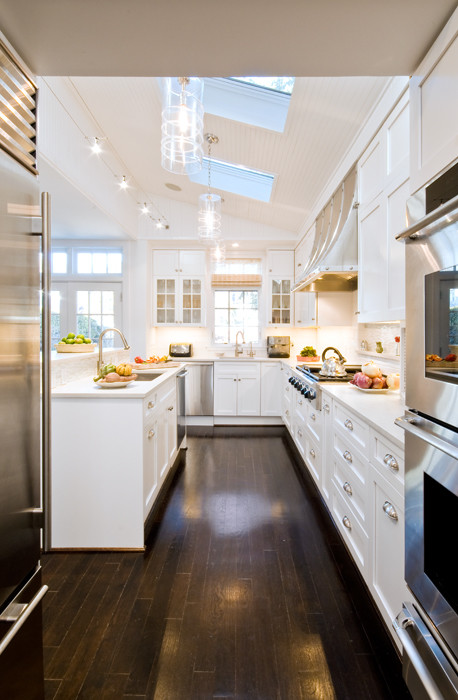 eclectic kitchen design by philadelphia kitchen and bath William V. Noval


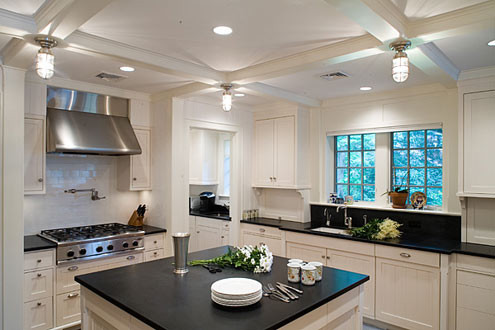

I can't wait to have a bright and airy, white kitchen. One of my favorite places to find home design inspiration is a website called Houzz. After making an account, you can save pictures to "ideabooks". Pictures of everything from kitchens to kids' rooms are added frequently by designers. Here are just a few of my favorite white kitchens..
Tuesday, March 22, 2011
A Proper Table Setting
I spotted this table setting diagram a back on With Style And Grace. It's a beautiful reminder of what goes where and I think it would look great framed.

Sunday, March 6, 2011
Antiquaria

I stumbled upon Antiquaria this week via Ritzy Bee, and I am absolutely in love. They offer the most beautiful vintage housewares and specialize in mixing china patterns. They even do bridal registries!


Friday, March 4, 2011
recipes I want to try

homemade pop tarts from Smitten Kitchen


herb bread from Joy the Baker

cauliflower with pine nuts & bacon from Simply Recipes

feta sun-dried tomato turkey burger sliders from Picky Palate

sauteed bacon, mushrooms, and lentils from Leites Culinaria
Subscribe to:
Posts (Atom)